If you’ve ever Googled “how to string a lacrosse head” at 11pm the night before a game, you already know the problem: most guides are written for people who *already know how to string a lacrosse head.
This one isn’t.
This guide is built from the ground up for the player who’s never touched a sidewall string — but it also has the tips and troubleshooting that intermediate players keep coming back for. By the time you’re done reading, you’ll have a pocket you actually built yourself. And trust us: the first time you rip a perfect shot out of a pocket you strung? That feeling doesn’t get old.
We’ve tracked the lacrosse world since 2002. We’ve seen factory pockets betray players on the crease at the worst possible moment. We’ve seen bad string jobs cost possessions. And we’ve seen players completely transform their game just by learning to dial in their own stick. That’s exactly why this guide exists.
⚡ Jump Straight to What You Need
Not sure where to start? Pick your situation:
- “I’ve never strung a head before” → Start at Section 1 and read straight through.
- “I strung it but it’s throwing weird” → Jump to the Troubleshooting Table.
- “I want to customize for my position” → Skip to Customize by Position.
1. What You Need Before You Start
Here’s the thing most guides skip: showing up to string a lacrosse head without the right materials is like trying to cook dinner with no ingredients. So before you touch anything, make sure you have these:

The shopping list:
| Item | What to Get | Why |
|---|---|---|
| Mesh | Semi-soft, 9-diamond | Forgiving for beginners, great feel for everyone |
| Sidewall strings | 4 strings, ~27″ each | One per side, plus backups |
| Top string | 1 string | Foundation of your whole pocket |
| Bottom lace | 1 lace | Controls pocket depth |
| Shooting strings | 1 nylon cord + 1–2 laces | Controls ball release |
| Scissors + lighter | Any | For trimming and sealing frayed ends |
Don’t want to hunt down each piece separately? The StringKing Type 3s Handy Kit has everything in one box — mesh included — and it’s the kit we’d hand to any player stringing for the first time. Semi-soft mesh is more forgiving, strings up easier, and breaks in beautifully. If you’re an intermediate player who wants a stiffer, more precise feel, the StringKing Type 3X Kit is the semi-hard version.
One last prep step before you start: Soak your mesh in warm water for 2–3 minutes. This makes it more pliable and dramatically easier to work with. Don’t skip this — dry mesh fights you the whole way.
2. Know Your Pocket First (2 Minutes That Save You 2 Hours)
This is the section that separates players who string a great pocket from players who string something, hate it, and rip it out and start over.
There are three pocket types. You need to pick one before you string a single knot:
| High Pocket | Mid Pocket | Low Pocket | |
|---|---|---|---|
| Where the ball sits | Near the top/scoop | Middle of head | Near the throat |
| Best for | Defense, control, ground balls | Everyone — all-around | Attack, quick release |
| Feel | More hold, slower release | Balanced | Fastest release, less hold |
| Beginner-friendly? | ✅ | ✅✅ | ❌ |
Not sure which one to pick? Choose Mid Pocket. Every time. It’s the most forgiving, the most versatile, and the easiest to adjust later. That’s what this guide will walk you through.
One rule you need to know before you go any further: In men’s lacrosse, the top of the ball cannot sit completely below the bottom edge of the sidewall plastic. That’s the legal limit for pocket depth. Keep this in the back of your mind — you’ll check it after you attach the bottom string.
3. Step-by-Step: How to String a Lacrosse Head
Six steps. Clear instructions. And at the end of each one, a green check that tells you exactly what “doing it right” looks like.
Step 1 — Prep the Mesh
Take your mesh out of the package (or out of the water if you soaked it). Hold it up and identify the four sides:
- Top edge: 9 diamonds across — this is the row that connects to the scoop
- Bottom edge: 10 diamonds across
- Front side: Slightly rougher texture — this faces toward you when you cradle
- Back side: Smoother — faces away

Now fold the top 9-diamond row down onto the row below it (important). This creates a double-layered edge at the top that’s stronger and gives you a cleaner attachment to the head.
Stretch the mesh gently side to side and top to bottom. You want it relaxed, not bunched up.
✅ You’re good when: The mesh lays flat, isn’t twisted, and the top folded edge has 9 diamonds across.
Step 2 — Attach the Top String
This is the most important step in the entire process. Read it twice before you do it once.
The top string is your foundation. If it’s crooked, your pocket will be crooked. If it’s loose, your mesh will shift every time you take a hit. Get this right and everything else falls into place.
How to do it:

Take your top string and find the center hole at the scoop of your head. Start there. Work your way from the center hole outward to the left, feeding the string through the mesh diamonds and the head holes in an alternating pattern — through a hole in the head, through a diamond in the mesh, back through the next hole, and so on.
Keep tension even the entire way. Not death-grip tight — just firm and consistent.
Once you finish the left side, go back to center and repeat outward to the right.
When both sides are done, tie off the ends securely with a double overhand knot at each outside hole. Pull them tight and tuck the tails.
Stuck on the knot? You’re not alone — this trips up almost everyone the first time. Think of it like tying your shoe, but looping twice before you pull through. Snug, not yanked.
✅ You’re good when: The center of the mesh lines up exactly with the center of the head. No pulling left. No pulling right. The top row of diamonds sits flat and even across the scoop.
Step 3 — String the Left Sidewall
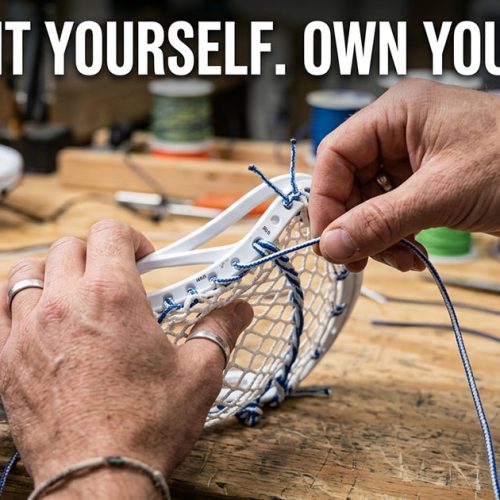
Here’s where your pocket starts to get its personality. The sidewalls pull the mesh down into the head and create the channel — that curved shape that holds the ball.

Take one sidewall string and tie an anchor knot at the top hole on the left side of the head. Then work your way down the sidewall, connecting the string to both the head holes and the mesh diamonds using a Standard Interlock (SI) knot.
Wait — you’re probably wondering what an SI knot is. Here’s the simplest way to think about it: you’re grabbing a diamond of mesh, looping your string through it, and cinching it down against the sidewall rail. The string goes through the hole in the head, wraps around a mesh diamond, and locks it in place. Pull it snug.
Tension is everything here. The tighter you pull, the deeper your pocket will be on that side. Aim for firm and consistent — like you’re pulling a tight but comfortable handshake.
Work your way down hole by hole until you reach the bottom of the sidewall. Tie off with a double knot at the last hole.
✅ You’re good when: The mesh on the left side is pulled evenly into the head with no loose sections, no puckering, and a visible pocket shape starting to form.
Step 4 — Mirror the Right Sidewall
Okay, real talk: this is the step where 80% of first-timers go wrong.

Most people finish the entire left sidewall, then try to do the right side from memory. The result? Two sides that look nothing alike, and a pocket that throws like a broken compass.
The fix is simple: As you string the right sidewall, pause every 2–3 holes and hold the head face-up in front of you. Look straight at it. Both sides should look like a mirror image of each other — same tension, same spacing, same depth.
If one side looks tighter, loosen it a bit. If one looks baggier, tighten it. You can adjust as you go. Once you tie off the final knot, undoing a whole side is a pain.
Tie off at the bottom with a double knot, same as the left side.
✅ You’re good when: You hold the head face-up and both sides look symmetrical. The channel runs straight down the middle. The mesh doesn’t tilt left or right.
Step 5 — Bottom String (Your Pocket Depth Control)
The bottom string is your volume knob. Tighter = shallower pocket. Looser = deeper pocket. It’s also your last chance to make sure your pocket is legal.

Here’s the simplest weave for beginners:
Find the last row of mesh diamonds you plan to use — count about 9 to 10 rows down from the scoop. Tie an anchor knot at the bottom sidewall hole on one side. Then weave your bottom lace through the mesh diamonds across the bottom of the head, connecting it to each bottom hole as you go. Keep the tension snug but not cranked.
When you reach the other side, tie off and leave a small tail.
Now do the legal check: Drop a lacrosse ball into the pocket. The top of the ball should be visible above the lower edge of the sidewall plastic. If the ball sinks completely below it, your pocket is too deep — tighten the bottom string.
✅ You’re good when: The ball sits at a comfortable depth, doesn’t rattle or fall out when you flip the head upside down, and passes the legal depth check.
Step 6 — Shooting Strings
You’re almost there. Shooting strings are what separate a pocket that holds the ball from a pocket that releases it the way you want.
The rule first: All shooting strings must sit within 4 inches of the scoop. Measure from the top of the head down — nothing below that line counts as a shooter.
The simplest setup for beginners: two strings.
- Top shooter (nylon cord): Weave it straight across about 1.5–2 inches below the scoop. Keep it moderately tight.
- Second shooter (lace): Weave it straight across about 1 inch below the first. Keep this one slightly looser than the top.
For each shooter: thread the string through the sidewall hole on one side, weave it over-under across the mesh diamonds (up one, down the next), and tie off on the other sidewall hole.
When you’re done, trim any tails to about 1–2 inches and melt the ends lightly with a lighter to stop fraying. Do this carefully — you’re sealing, not burning.
Now go throw against a wall. That’s your real test. Five or ten throws tells you more than any amount of staring at the pocket.
✅ You’re good when: The ball releases cleanly and flies straight. No hard hook. No clunking off the plastic. It might take a few minor adjustments — that’s completely normal.
You can follow the video from Powell Lacrosse here:
4. Troubleshooting: “Why Is My Stick Doing That?”
This is the section you bookmark. Every pocket problem has a cause — and a fix.
| What’s happening | Most likely cause | Fix it like this |
|---|---|---|
| Ball flies high on every throw | Top shooter too tight | Loosen the top shooter slightly, retest |
| Ball digs into the ground | Shooters too loose | Tighten top shooter, retest |
| Pocket pulls left or right | Sidewalls uneven | Re-do the tighter side with less tension |
| Ball falls out when cradling | Pocket too shallow | Loosen the bottom string |
| Weird “clunk” on release | Top string loose | Remove mesh, re-do the top string tighter |
| Mesh bags out after 2 weeks | Low tension or soft mesh in rain | Tighten sidewalls; switch to semi-hard mesh |
| Ball gets “stuck” on release | Shooters too tight or placed too low | Loosen shooters or move them higher |
| Pocket feels different each throw | Mesh not broken in | Keep throwing — or soak mesh and pound with a ball |
The most important thing to know: don’t try to fix everything at once. Change one thing, throw ten balls, evaluate. Stringing is a process of small adjustments, not a single magic fix.
5. Customize by Position
Once you’ve got the basics down, this is where stringing gets fun. Different positions have different needs — here’s the quick version:
Attackman — You live off quick release and one-handed control. Go with a low-mid pocket and use only one shooting string, kept relatively loose. You want the ball out fast, not held.
Midfielder — You do everything, so your pocket should too. A true mid pocket with two balanced shooters gives you the versatility to pass, shoot, and cradle through traffic all in the same shift.
Defender / LSM — You need hold for ground balls and control when you’re getting checked. String a mid-high pocket with tighter sidewall tension and two firm shooters. More hold = more control under pressure.
Face-off (FOGO) — This is a completely different animal. FOGOs typically want a very tight channel, harder mesh, and a specific knot pattern built for clamping and raking. If you play face-off, check out our guide on the best face-off lacrosse heads — the head itself matters as much as the stringing.
6. FAQ
How long does it take to string a lacrosse head?
Your first time? Plan for 2–3 hours. Don’t rush it — tension decisions made in a hurry are the ones you redo. By your third or fourth head, you’ll be done in 45 minutes to an hour.
How often should I restring my lacrosse head?
Most players restring once or twice a season, or whenever the mesh loses its shape and won’t hold tension anymore. If your sidewall strings are fraying or the pocket won’t stay consistent no matter how you adjust it — it’s time.
Can I use football or soccer mesh for lacrosse?
No. Lacrosse mesh has a specific 9-diamond structure designed for the shape of a lacrosse head and the way the ball moves. Football and soccer mesh won’t string properly or perform anywhere close to the same.
What’s the difference between hard mesh and soft mesh?
Soft mesh has more give, breaks in faster, and is easier to work with — great for beginners. Hard mesh has less stretch, holds its shape better in bad weather, and gives a more consistent feel once it’s broken in. Semi-soft (what this guide recommends) sits right in the middle.
Should I wet my mesh before stringing?
Yes — especially if you’re a first-timer or using hard mesh. A 2–3 minute soak in warm water makes the mesh significantly more pliable and easier to work with. Let it air dry completely after you’re done stringing.
Is it hard to string a lacrosse head for the first time?
Honestly? The first time is a little frustrating. But it’s not hard — it’s just unfamiliar. Follow each step carefully, don’t rush the sidewalls, and check your symmetry as you go. The second time you string a head, you’ll be surprised how much easier it feels.
You Did It. Now Go Rip Some Shots.
Stringing your own lacrosse head isn’t just a skill — it’s ownership. You know exactly what’s in your stick, exactly how it was set up, and exactly how to fix it when it needs adjusting. No waiting on a shop. No guessing what someone else did.
The first time takes longer than you expect. The pocket might not be perfect. That’s okay. String it, throw it, adjust it. Every iteration makes you better at reading your stick — and that makes you a better player.
If you’re still looking for the right materials, the StringKing Type 3s Kit is what we’d start with. Everything you need, one box, trusted by players who’ve been stringing their own sticks for years.
Now get out there and throw.